Saturday, December 26, 2015

New Felted Soaps


I really love to make felted soaps. It is a great way to do something unique and creative with extra bars of soap from a larger batch or to give a new life to wonderful smelling soaps that just are not as visually attractive as I had hoped - it is like a makeover for soap. Below are some of my most recent creations. The felted soaps have been extremely popular - especially the garden and floral themed ones.

Each cold process soap (you can felt over melt and pour too) is first wet felted using carded merino top wool, Romney wool or a wonderful merino and silk blend - some soaps use several wool varieties. Then the designs are needle felted on using the same types of wool for the wet felting. It takes very little wool (about .25 - .3 ounces) to encase an entire 4 ounce bar and even less to create the needle felted designs. 

The design possibilities are endless with these and are a wonderful creative and relaxing outlet. 


~ Faith

Monday, October 26, 2015

Gahhh - failed rimmed soaps and what to do with all those failed attempts.......

Since I spent quite some time trying to figure out how to create a rimmed soap so that it could be reproduced again and again with good results, needless to say, there have been many failed attempts. But, as someone who does not like to waste good soap, there are many ways you can still use the soap from these failed attempts. My most recent failure was just last week when I added too much sodium lactate to the rim soap and it wanted to crack on me. It was till flexible/moldable, but not enough to roll nicely without cracking. Knowing what was coming, I immediately stopped trying to roll it as I knew from past experience not to try to continue on with rolling and forming into the PVC pipe - it just leads to a mess.

Instead, I chose to use individual square silicone molds to create a square rimmed soap. While this can be quite a bit more laborious, the results are great. I take the slab and cut individual edges for each length and height of the mold (mine is 3" x 3" x 1 1/4"). This works for rectangular individual molds too.  Each piece is mitered at the corners or you could just cut them to fit and overlap at each corner. You can even just place rimmed pieces on two opposite sides instead of using all 4. Create a new batch of soap for the inner portion and proceed as usual filling each individual mold with new soap.

Allow to gel and unmold when hardened enough to do so. These will need some cleaning and trimming to look good, but the finished soap is really unique and beautiful.

My original slab (the colors muted a bit after gelling this part)


Square molds with rims cut and formed from the slab.
New soap batch poured into each mold


Finished Soap Cleaned Up and Edges Beveled
Both a full rim (left) and a 2 sided rim (right)


These bars were scented with a pumpkin spice fragrance that I know will turn a bit darker orange than the color shown here as the soap cures. 

Not round, but still a unique rimmed soap.

Other things you can do to reclaim your failed soap rims.

 - Create soap shreds to used in a new batch of soap
 - Cut the rim into long strips to use as embeds
 - If your slab is thick enough, use small cookie cutters to make mini guest soaps
 - Create Soap curls to add to a new batch of soap
 - Create soap balls to use as embeds in a new batch

Some of the above ideas have been used in these soaps below. The two soaps to the right (the embedded soap balls and flower shaped guest soaps) were from the same failed rimmed soap attempt too.


~ Faith
Friday, October 9, 2015

Rimmed Soap Tutorial


It has taken me quite some time to figure out and be able to recreate a rimmed soap design - both in cold process and a combination of melt and pour and cold process. Now that I feel confident in being able to recreate this in a variety of designs with consistent results, I will share how I put this together. For cold process soap, it takes two days to complete. Day 1 to create the rim and allow it to set to be firm enough yet still flexible to manipulate. Day 2 to create the inner core soap. Depending on your formulation, you may be able to do this in a shorter amount of time, but I find the 2 day process works for me. Melt and pour/cold process can be done in 1 day as it takes only an hour or so for the melt and pour rim to set up.

Saturday, September 19, 2015

Collection of Rimmed Cold Process Soaps


I have spent the past 2 months trying to perfect and be able to easily recreate a rimmed soap design and finally have a technique down that works pretty consistently. A rimmed soap is a soap that has a band of soap surrounding an inner soap core. The design potential for the rim is endless - from a solid color, to a swirl and even being able to add more decorative elements on the surface. 

Tutorial coming soon!


These soaps are a two day process. Day 1 to make the soap for the rim and day two to cut and mold the rim and make the soap for the inner core. I do not scent the outer rim to keep it easy to work with without have to deal with issues that some fragrance oils can bring to your soap.  These are all cold process soaps but can also be done with melt and pour or a combination of the two - I have not tried those yet.

Below is a collection of the rimmed soaps I have been successful in making. Some were part of the trial and error process and others from successful recreations of the technique I used.


~ Faith

Tuesday, July 7, 2015

Back to my first love - creating decorative artisan cold process soaps.

After spending several months formulating and standardizing some new products (liquid shampoos, liquid body wash) I was finally able to get back to my my first love - creating artisan cold process soap. Soap cleans, soap can be gentle or harsh but soap can also be beautiful - and I love creating beautiful and artistic soap. The artistic design is the icing on the cake, the finishing touch to a useful product and what sets it apart from.... well... just soap.

Here are some new designs that have either been recently listed for sale or are still curing to be available in a few weeks.  Functional, yet beautiful - what is not to love about that?


If you are interested in soapmaking and looking for supplies, here are a few of my favorite suppliers:

Bramble Berry -  Base oils, fragrance oils, molds, colorants, containers, lye, Melt and Pour Bases and great educational resource
Soapers Choice - Base Oils and Butters
Elements Bath and Body - Fragrance Oils, Melt and Pour Bases
Natures Garden - Fragrances
Wholesale Supplies Plus - Fragrance Oils, Containers, Molds
Mad Oils - Colorants
The Lye Guy - Sodium Hydroxide, Potassium Hydroxide

~ Faith

Thursday, May 21, 2015

Brush Embroidery Decorated Cold Process Soap

After spending quite some time decorating sugar cookies use brush embroidering decorating techniques with royal icing (see this post) , it occurred to me that I could use that same technique to embellish some of my cold process soap bars. Since I am always drawn to beach scenes, that is was the perfect place to start.

This is a quick picture tutorial of how I accomplish this. For more detailed instructions, there are several cookie websites that have tutorials on the brush embroidery decorating technique.

Here are some of my beach themed royal icing sugar cookies to the left and the finished soap to the right.


I am going to recreate this type of design with cold process soap. Both in circular and square soap bars.

Sunday, May 3, 2015

pH testing of liquid soap and lowering pH

One of the most confusing aspects of liquid soapmaking is pH. What should my pH be? How can I lower the pH of my soap? Why do I need to know the pH of my soap? 


Liquid soap is an alkaline product meaning it wants to and will always have an alkaline pH - typically between 9 - 10.5 If you try to lower the natural pH of your soap, you begin to release fatty acids into the mixture which can cause all sorts of problems from separation of these fatty acids from the soap into a distinct layer that floats to the surface, to haziness, cloudiness and so on on.  


When making liquid soap, it is lye excess that you need to worry about not pH. Having excess lye in your soap is what causes it to be caustic and not safe to use. Testing pH will not tell you if you have excess lye and you need to test with either a zap test on your cooled paste or with Phenolphthalein drops. 


Sunday, March 29, 2015

Picture Tutorial of Side Embeds in Cold Process Soap

This is a simple picture tutorial of how I make one of my favorite soap designs. The sides of the bars are created first using an "In the Pot" Swirl technique and poured into a mold that has acrylic dividers to get evenly sized embed bars. I use sodium lactate (5g per lb of oils) in this formulation because it makes it much easier to remove the acrylic dividers from the soap.


This is a 4 day process and I use the same formulation for the side embed logs that I do for the main soap.


Monday, March 23, 2015

Hobbies - everyone should have one or two....

Everyone should have a hobby or two. Something you really love to do without the pressures of work or other commitments. For me, one of my hobbies is baking especially types that invite creativity. One of my favorite things to do is to make decorated sugar cookies - a creative outlet that is greatly appreciated by many (nom, nom....) These past two weeks I have refined some of my royal icing techniques to create some unique spring and summer designs.


What do I do with all these cookies you ask? Well some get eaten here, some go to friends and family, some are sent in care packages to our college students (college students LOVE getting any type of care package) or donated to charitable events.

I love this hobby of mine and I think others do too.

~ Faith

Thursday, March 5, 2015

Creating Embeds in Individual Molds or Logs

There are so many unique techniques and tools for creating interesting and beautiful bars of handcrafted cold process soap. One of my favorites is to use embeds to create a more structured look that combines the free flowing design element of swirling your colors against a solid color to really make that embed pop. Embeds can be incorporated into your soap in a variety of ways. They can be added to the surface design in either a log mold or individual bar molds, embedded individually or as a long piece into a log mold so that the design shows through as you slice the log and embedded individually in individual single bar molds. This tutorial will show how I embed soap into individual silicone molds and log molds.


One reason I like to do these individually is to carefully control the placement of the embedded element. For these bars, I want the embed to only be on one side of the bar because I am going to use a soap stamp to add a design to the other side of the bar. The one drawback to this method is there is more labor involved and more cleaning up of the individually bars - so be prepared for a bit of waste that will come with trimming these bars.

Key points that I will note in regards to making these soaps:
 - This is a two day process. Day 1 to make the embed pieces and Day 2 to make the base soap. If you wait a long time in between, your embeds will have partially or fully cured and adding them to new soap can cause them to protrude a bit as the new soap cures and shrinks around the embeds.
 - I use the exact same formulation for both the embeds and the main soap.
 - You can scent the embeds or keep them unscented. If you choose not to scent them and you have extra that you want for a different project, you are not limited by an existing fragrance.


Friday, February 20, 2015

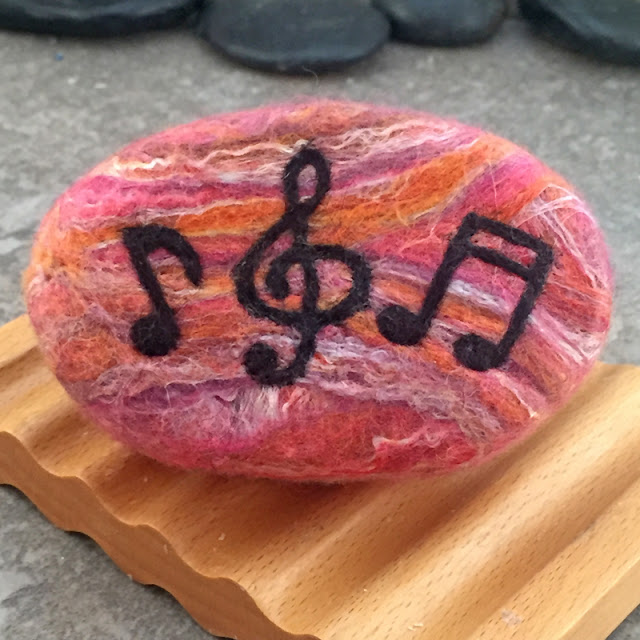
Waiting for Spring...... New floral and music themed felted soaps.

February 20 in the Chicago area and I woke up to -8 degrees outside (windchill somewhere in the -20's) - even for a lifelong Chicagoan, this is just too cold for February. So instead of looking out my window wondering when all this snow will melt away and allow the spring blossoms to make an entrance I have created my own February garden in felt. Enjoy and let's hope for an end to these subzero temperatures.


These felted soaps are available in my Etsy Shop Here

~ Faith